Pages

Thursday, November 8, 2012

Blueberry Crumb Coffee Cake

I love sweet things. I mean really love sweet things. Candy, cakes, smoothies, ice cream, chocolate, etc. There are only a handful of people I know who don't care for sugary goodness. I am not one of them, With that being said....when my husband asked me to make him a blueberry crumb coffee cake one day, I was more than happy to oblige. I am a baker. Okay, not by profession but I do love to bake. I can't cook to save my life. Or my husband's life, or even my kids' for that matter. But baking is something I can do fairly well, without killing everyone who consumes my finished product. I had never baked a crumb cake before this. In fact, I had never even baked with blueberries before this. Well, it turned out scrumptious! It looked pretty, too! I will share with you the recipe that I used. I don't think I will use another recipe, or even try one out. This one was perfect! 


Blueberry Crumb Coffee Cake

INGREDIENTS:

1/2 stick Butter

1 Tablespoon (additional) Butter

3/4 cups Sugar

1  Egg

1/2 teaspoon Vanilla Extract

2 cups All-purpose Flour

2-1/4 teaspoons Baking Powder

1/2 teaspoon Salt

3/4 cups Whole Milk

2 cups Fresh Blueberries


CRUMB TOPPING:

3/4 sticks Butter

1/2 cup Sugar

1/2 teaspoon Cinnamon

1/2 cup Flour

1/4 teaspoon Salt

Preheat oven to 350 degrees. Grease a 9 x 13 inch pan.
Combine flour, baking powder, and a salt. Stir and set aside.
Cream 1/2 stick plus 1 tablespoon butter with cinnamon and sugar. Add egg and mix until combined. Add vanilla and mix. Add flour mixture and milk alternately until totally incorporated. Do not overbeat. Stir in blueberries until evenly distributed.
Pour in batter.
In a separate bowl, combine topping ingredients and cut together using two knives or a pastry cutter. Sprinkle over the top of the cake.
Bake cake for 40 to 45 minutes, or until golden brown. Sprinkle topping with granulated sugar.

Monday, November 5, 2012

Hair Bow Tutorial

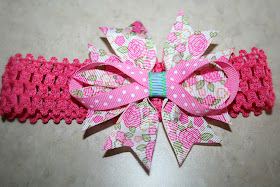
Woohooo!! Today was a fabulous and very productive day! I was able to whip out a few headbands and hair bows and I even snapped some photos while I was making one of the hair bows. So here is a quick tutorial of one of my favorite hair bows to make. It is so easy and so simple to make. I have made countless of these for my little girl in many different colors and sizes. I can never seem to find ones I actually like enough to buy at the store. It's so much more fun to walk into the craft store and have endless supplies of ribbon to choose from. My ribbon collection really has gotten out of hand. I mean REALLY! Everywhere I look, I see spools of ribbon that have somehow managed to sneak away from their large number of counterparts. Anyways, you get the point! Ribbon is cheap and gives you the opportunity to make something that is truly unique. If you haven't made one of these before, and you have some extra ribbon lying around the house, give it a try and just see how easy it is!

Cut four, 4 inch strips of ribbon.

Next, make inward slits on both ends of the ribbon. Then heat-seal with  lighter to keep the ends from fraying.

Cut out a 9 1/2 inch strip of any pattern ribbon of your choice. Just make sure it is skinnier than the first ribbon you cut. Once it is cut, hot-glue it into a Figure 8. With the remaining four strips of ribbon, pinch them together in the center to form a "gathered look" and hot glue it so that they look like the picture above.

Next, glue the four strips together like this.

Now you can hot-glue the Figure 8 strip to the top of the four ribbons.


Lastly, you will need to cut out a 1 inch strip of ribbon the circle around the bow to completely cover the center. I chose to add an alligator clip to the back and clipped it onto a crocheted headband. 

Please feel free to send me a picture of yours! I love to see all the unique creativity!

Thursday, November 1, 2012

Halloween Is Over!

Okay, I know I've been REALLY bad about blogging lately. It seems there are really not enough hours in the day to do all things I want to do. On my days off, I have about 2 hours while my youngest is napping to have some 'me time' before my other two get home from school. I have come to the conclusion many, many moons ago that 2 hours just isn't long enough. I have been working a lot, crafting a lot, and baking not so much! I made some candy apples a few weeks ago that turned out really good. It was my first time ever making candy apples and I found the recipe on Pinterest. Ha....where else?? I also baked some Halloween cookies and my kids helped me decorate them. Being as Halloween was yesterday, I figured it was still okay to post the pictures.  I think everyone in my house adore sugar cookies so I think it's safe to say that they were a hit. I hope everyone had a fun-filled Halloween because the holidays are just beginning!